My money's on the Stay-Puft Marshmallow Man.
(link),Jan 20
RT @WardQNormal: The trouble with conspiracy theories is that a lack of evidence is not taken as proof it's not real, but instead as proof the conspiracy is indeed everywhere. This is like thinking that the reason you never see elephants hiding up in treetops is because they're good at it.,Jan 12
Publius Clodius was a populist demagogue in the late Roman Republic. He knew how to whip a mob up into a frenzy, but he wasn't clever enough to use them effectively. He failed.,Jan 7
One of these seems to say "Come on down!" (link),Jan 7
Just a reminder that I still have a bunch of old original art for sale. These all come to us from the 1980's, with drawings from The Runestaff, the Leslie Fish/Rudyard Kipling Cold Iron songbook, The Folk Harp Journal, and more.
(link)(link),Jan 14
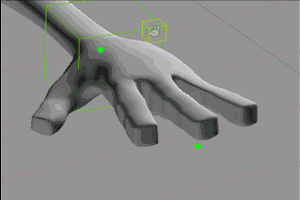
Next week, Autodesk will be releasing its free photo to 3D application Photofly. This video shows how it works. You’ll see they’re getting pretty respectable results without a sophisticated camera setup, so that it’s possible to take all the photographs for a building model by simply walking around the building, or of a head by moving around the person and taking pictures from a variety of angles without any kind of carousel for the subject or a fixed array of cameras.
The system uses a local Windows application called the Photo Scene Editor to assemble all the reference pictures and submit them to Autodesk’s servers for processing. Within the editor you can make some changes to your geometry based on entered measurements. Some amount of cleanup is also possible in the Editor. You can see more about the Editor’s features in the video below.
Any system for 3D digitizing gives you some crazy topology that has to be cleaned up. In earlier studio systems this was always combined with way too much geometry; here you can see that the triangular polygons, whose numbers are comparatively restrained, are still constructed with a bit of eccentricity.
The environmental models could probably be used as-is: the same goes for static props. But for character work you’d really need to retopologize the model so it’d animate well.
As I’ve watched these (and some other demos), I’ve been thinking about how well this might work for digitizing costume bits, clothing, and even plants – naturally draped and shaped objects that are difficult to create with polygon modeling. I think the possibilities for clothing and costume parts are especially interesting, given how many steampunk fans go completely mad with their costume work. Neat!
There’s recently been a lot of interest in adapting Microsoft’s Kinect into homebrewed 3D digitizing systems: but this, which is first of all free, and secondly requires only a digital camera, looks awfully promising. I guess we’ll find out in a week or so at the Photofly site.
I’ve had an admiring eye on Project:Messiah for several years now. It’s a sophisticated 3D animation system, though it’s gradually grown some nice rendering capabilities, too, like sub-surface scattering, global illumination, and a hair system.
The latest version is messiahStudio5. In one version or another, the program’s contributed to a lot of film productions including The Tripletes of Belleville, Hellboy, Jimmy Neutron, Ghost Rider, the Harry Potter films and, well, more.
The developers are doing a remarkable thing with messiahStudio5 right now. In a sort of self-built Kickstarter type promotion they’re offering their software for practically nothing… but only if enough people sign on to buy at these prices.
So the basic version of messiahStudio5 – at the moment – could be yours for $10, while the Pro version is offered at $40. Their normal prices are $499 and $1195, so you can see what I mean by "practically nothing".
Because it is a promotion your purchase won’t be completed unless enough people respond. If the promotion fails your money will be refunded and, well, that’s that.
It’s easy enough to see that they’re relying on everyone who wants to get their software at these prices to go out and tempt as many other people as possible, in order to create a viral groundswell. Pretty clever, no?
Messiah’s strengths are in its rigging and skinning system. Since it also functions as a plug-in it’s possible to use its animation features inside another 3D application like 3DS Max or Maya. It’s well worth a close look, and you can bet that it’s not likely to be available at these prices for very long. How long? They don’t seem to say. But a graph on the sale page shows how close they are to the goal.
Guillermo M Leal Llaguno has released version 1.00 of a stand alone, post processing program called Glare.
The program’s loaded with options for specular blooms, rays, and other effects. From its demo video it looks like Glare offers all the fine tuning you could ask for: you can view and adjust which highlight levels should get the effect and view those selections and their effects either alone, or overlaid on the source image(s).
Using a stand alone application like this means that the effects can be tweaked and changed at any time after rendering – nice! – and because the program will work on image sequences you can add blooms to whole animations without having to re-render a thing.
I’m thinking about renderings here, but I guess it might not be obvious that this works equally well with video footage.
The final bits of the demo video show some of the possibilities for compositing Glare’s edited frames with the original frames of an animation.
At US $50 it looks like a great tool to add to the toolbox.
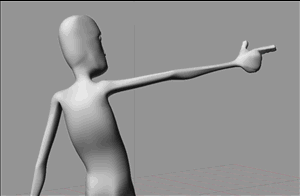
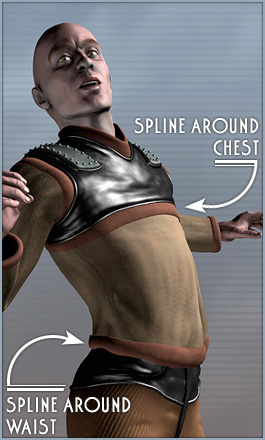
In spite of what I said yesterday about how much I hate skinning characters to their skeletons, every now and then I do get to smile. My latest trick is to skin the characters not only to bones, but to splines that are (sometimes) also skinned to some of the same bones.
So when Harry’s chest and waist were getting pulled back and forth between warring bones I extracted some splines from his model, skinned those splines to parts of his skeleton, and added the splines to the bones that control Harry himself.
Then I adjusted the influence of those splines to even out the skinning and lock down the chest and waist lines – which are structural parts of his clothing, among other things.
This is a lot like what I’ve lately been doing with faces. The 3DS Max UI does a lousy job of displaying the splines’ envelopes, but since I can see the results on the model that’s not a huge problem.
The biggest downside seems to be that if you intend to edit the splines, as I’m doing in my faces, it’s not a great technique for animation because it’s hard to keyframe the shapes of the splines*. I guess you could create morph targets for the splines, which is a thought, but I so rarely do animation that I’m not worrying about that for now.
One reason this might be nice for animation, though, is that you can use the splines to simulate the way surfaces like skin or cloth slide over the more rigid surfaces they cover. That’s sort of what’s happening here already.
*Oh, there might be a way, but I don’t seem to be clever enough to work it out.
My friend Glenn Price just showed me something he’s working on, and that reminded me of Andy Murdock‘s Lots of Robots. I hadn’t watched it in awhile, and before I knew it, well, that’s what I did. Now you should too.
Andy’s been pretty busy recently with his work for the National Geographic Channel but I hope he gets back to this one day.
Sadly it looks like you can’t buy the DVDs at the moment. You can’t have mine.
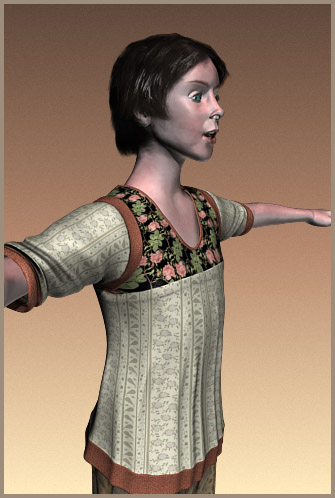
Okay, I got that out of my system. I finished up Tallie’s brown hair, which will end up on somebody’s head someday, but then I wheeled her back into the shop.
As I textured her I started with the fabrics, which led to the complexion, which led to the hair; and when I’d reached the end of that road she wasn’t quite who I thought she’d be when I started. Sometimes that’s good – characters often know themselves better than we know them – but this time, I think, I’d just put the cart before the horse.
So here’s much more the Tallie I thought I was making when I started her. I had an interesting time with her skin tones – it’s so easy for pale skin materials to end up looking dead – but eventually I came up with something that I like (again!) using very much the same techniques as the earlier version. The paler areas have a surprising amount of blue in them, to suggest that translucency you need in skin that’s not undead. So today… this is what I like :).
One other thing I know about Tallie is that she’s quite fond of hats. Happily this hair will adapt to headgear a lot better than the other.
Here’s an update on Tallie, that new character I’ll be using in the Clockwork Book stories. I had some adventures with her hair, which I now sort of like – it’s sculpted with Mudbox, which is something I haven’t done with hair before. I just about always do some retouching on my characters’ hair, so my goal was to come up with something that’d nearly work.
Which might be a larger lifetime goal than I realized when I started to type that sentence.
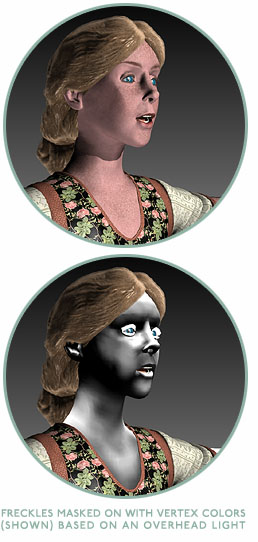
Anyway, one of the things I like best about Tallie is the way I constructed her skin material. It’s based on two copies of a SymbiontMax material ("Human"). The first skin material’s pale, while the second one’s freckled.
I’m masking between those materials using vertex colors. You can see Tallie’s vertex colors in the lower left image.
All the heavy lifting for the vertex colors was done by baking in the lighting from an overhead light source. (In Max, that’s done with the Assign Vertex Colors Utility.) I positioned a directional light so that it cast light where sunlight would. That way Tallie’s more tanned, freckled skin tones show up just where more tanned, freckled skin tones really happen. I touched up the vertex colors around her throat and on her hands, but other than that it’s a pretty simple simulation of the way her skin would really be affected by the Sun. Neat!
Then a painted material gets masked on to affect her lips and eyebrows. But apart from those details her skin’s completely procedural.
Now, I regret to say, I have to skin her to a skeleton. That’s the part of character work that I always dread. But first… the lawn! I dread yardwork slightly less than character skinning.
Update:
This comment interested me enough that instead of skinning the character (which I know sounds awful; that’s just what it’s called) I’ve been modifying her ridiculously complex hair material to see what kind of brunette Tallie would make. I find that I also sort of like this version, and maybe more than I sort of like the original one.
I also established that the best example of a brunette (brunet?) in Trapped in the Tower of the Brain Thieves is wearing aviator’s headgear, so you never actually see his hair.
[tags]thrilling tales of the downright unusual, clockwork book, 3d character, vertex colors, materials, hair, mudbox[/tags]
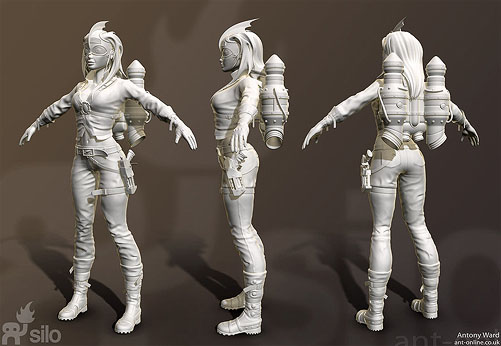
Just spotted this at Deviant Art: Antony Ward’s 3D model of a "Rocket Girl" character, via Silo, ZBrush and Maya. Really nice sculptural work there, and an interesting approach to her hair. I don’t think the character herself needs much explanation, since it goes something like this:
Girl x (Rocket Pack+Fins) + (2 x boots / raygun) = awesome
Tomas Pettersson’s DonationWare Sculptris has come a long way since we first heard about it several months ago. The 3D sculpting application produces results a lot like what you get from the basic features of HelluvaLottaMoneyWare programs like ZBrush and Mudbox, but it’s a hobby project that’s supported by voluntary donations. The video above is a user video by Syntax Error. (Part two is here.)
You can start out with a simple sphere, as we see in this example, or you can import an existing .obj file. I’m still blundering around with it but I’m always curious about ways in which to combine these organic modeling tools with rigid, streamlined shapes for ever more interesting rockets and whatnot. I especially like how well its "Reduce" brush brings down the resolution of an area I’ve been mucking about with.
I did convince the program to hide under its blanket at one point… but overall it seems pretty neat. Try it out!
One of my very first posts here at the Web-O-Blog was about Alexis Van der Hague’s animation Stilt Walkers: an animated short that was rendered with 3D tools in such a way that it recalled the style of traditional paintings. That, and the lyrical style of the piece, impressed the heck out of me. Just lovely.
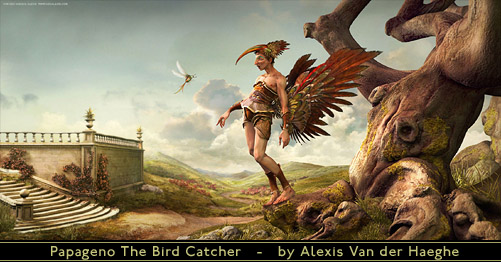
3D Total is hosting a "Making Of" article for a new image by Van der Hague. Here we see a portrait, within an 18th century landscape, of Papageno from Mozart’s The Magic Flute.
This time around we get not just the final product, which is sensational, but a breakdown of how Van der Hague has used 3D tools (ZBrush, Maya, and Mudbox) to build something that’s beautifully not photorealistic. That’s pretty close to a description of what I try to do. It’s just that the "not photorealistic" styles we’re each aiming for are pretty different.
This article’s a great example of how that can be done. Excellent work!
My money's on the Stay-Puft Marshmallow Man.
(link),Jan 20
RT @WardQNormal: The trouble with conspiracy theories is that a lack of evidence is not taken as proof it's not real, but instead as proof the conspiracy is indeed everywhere. This is like thinking that the reason you never see elephants hiding up in treetops is because they're good at it.,Jan 12
Publius Clodius was a populist demagogue in the late Roman Republic. He knew how to whip a mob up into a frenzy, but he wasn't clever enough to use them effectively. He failed.,Jan 7
One of these seems to say "Come on down!" (link),Jan 7
Just a reminder that I still have a bunch of old original art for sale. These all come to us from the 1980's, with drawings from The Runestaff, the Leslie Fish/Rudyard Kipling Cold Iron songbook, The Folk Harp Journal, and more.
(link)(link),Jan 14


 In spite of what I said yesterday about how much I hate skinning characters to their skeletons, every now and then I do get to smile. My latest trick is to skin the characters not only to bones, but to splines that are (sometimes) also skinned to some of the same bones.
 Okay, I got that out of my system. I finished up Tallie’s brown hair, which will end up on somebody’s head someday, but then I wheeled her back into the shop.
 Here’s an update on Tallie, that new character I’ll be using in the Clockwork Book stories. I had some adventures with her hair, which I now sort of like – it’s sculpted with Mudbox, which is something I haven’t done with hair before. I just about always do some retouching on my characters’ hair, so my goal was to come up with something that’d nearly work.
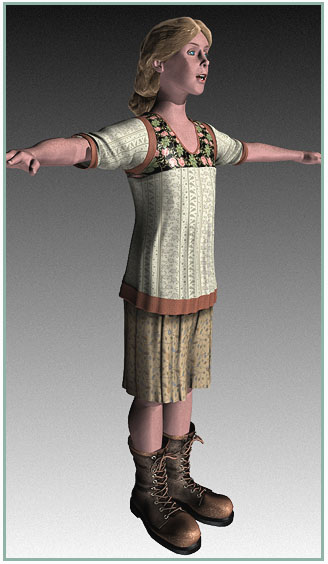
 Update: