


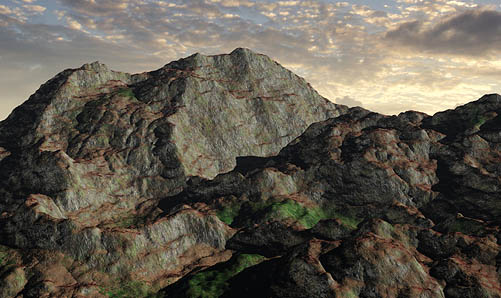
This is a test rendering of a natural landscape which I rendered in 3DS Max 8. The terrain’s from a height map I generated with the free version of World Machine. This height map became a Displacement map in 3DS Max.
World Machine is a program that generates terrain in the Terragen format – but it also exports 16 bit displacement maps that you can use in just about any 3D rendering system. The free version that I used here is missing a few features – though not many – and it can only export maps up to 512 x 512 pixels in size. The paid version doesn’t have those limitations and only costs $40. So, since I’m always fascinated with tools for building believable terrain, I thought I owed it to myself to give the free version a spin.
I’m going to write about how I used the program below. But because generating the terrain is often less of a problem than texturing it, I’ll continue with the way I built the complex material you see in this scene in 3DS Max.
I started by downloading the free “Basic” edition of World Machine. Then I fussed about with it and spent some time with its docs, which was time well spent because of the way in which the software works.
1. Creating the Height Map
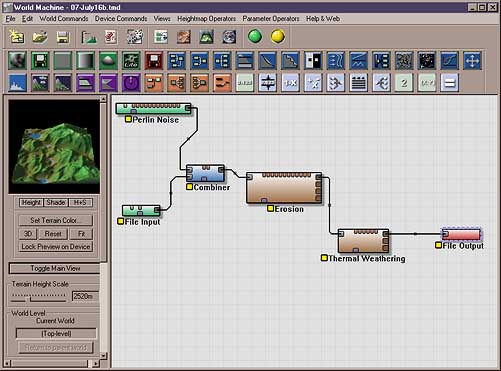
The interface for World Machine will remind 3DS Max users of Particle Flow – it uses a very similar system of operators (“devices”) that are linked together in a chain. So you start with a generator device, which is your starting point, and then add additional devices linked to it in sequence. These other devices include both Erosion and Thermal Weathering, Terracing, and so on.
Still more devices can be used for selecting part of the terrain based on its slope or angle; these and other techniques are used to create masks for some of the operations you’ll perform; and you can import a bitmap image to use as a mask, too. Two separate device chains can be linked together using a “Combiner” device that controls the way they’re blended.
Finally you have a file output device, through which you can save off your terrain as a Terragen file, or in several image formats.
This kind of system makes absolute sense to a programmer. It’s not my favorite sort of UI because of its abstract and indirect nature – I always have an urge to reach out for the thing I want to change, and just change the damn thing. But in practice, one has to alter a property that affects the thing one wants to change, then observe the result. This is what I mean when I say “abstract and indirect”.

So now that you know I’m not a fan of this kind of interface, I’ll tell you that in World Machine’s case it’s not excruciating. There’s a 3D preview of your landscape that updates as you change the properties of a device, so at least you’re not working in total isolation from the piece you’re working on.
And as you grow more familiar with the ways the Devices work, that preview almost feels interactive. Just keep it displayed on the screen unless you’re adding to or changing the device chain (you’ll want the graph view for that), and you’ll be fine.
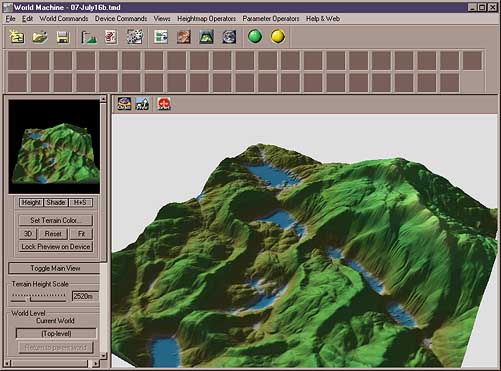
One thing you’ll want to know is that the 3D preview is a low quality version of the terrain. You’ll need to “Build” the terrain in order to see the true effect you’ve created – which is much more interesting, believe me, than the preview. The preview just serves to show you a quick version of the terrain as you change it. (You can see the difference between a preview and a “Built” terrain in the two screen shots above.)
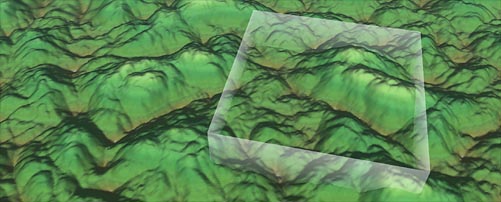
In World Machine’s “Explorer View”, you’re able to move the active box you’re working on. You can scroll that active box around a gigantic world that’s been generated based on the parameters you set. It’s pretty neat.
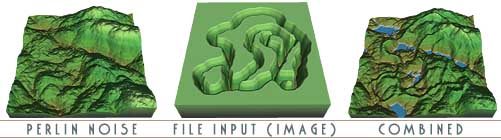
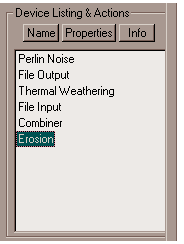 At left, you can see the list of Devices I used to generate my mountains. In the first screen shot above you can see what these Devices look like in the graph view where they link together. There’s a Perlin Noise Device to start off – but I’ve also loaded a
  bitmap image to create some less procedural features. That bitmap looks like the scaled down version here, on the right.
The Combiner Device lets me mix these two together using Add, Subtract, Min, Max, and other options. In this case I’ve opted to Subtract. You can see below how the terrain looked in each of these three stages.
Why did I use the bitmap? First off, I wanted to try creating a path through the landscape that I might use later; but also, the completely procedural landscapes – while they look good – are always a little bit… procedural. I wanted to carve something through that landscape in a more deliberate way. And hats off to World Machine, because that worked out just great.
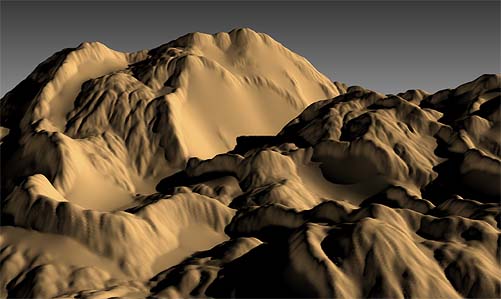
I especially like the Erosion device. It has several options that are easily grasped, and the “Channeled Erosion” mode does some wonderful and natural-looking things. Adjust those – then “Build”, because you won’t get much of this from the quick preview – and your landscape really begins to come to life.
 Finally I used the File Output Device to create my displacement map. Apart from the initial learning curve, this presented the biggest problem.
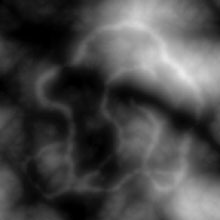
I had to work out which of the available formats I could use, knowing that I had to convert the file afterwards to something I could load in 3DS Max. The answer turned out to be that I needed to export a 16 bit RAW file and load it into Photoshop (using “Load As” Raw). From there I was able to save it as a 16 bit TIFF file, which Max would read. A scaled down, 8 bit version is shown on the right.
It’s at this point, having output my height map, that I moved on to 3DS Max.
2. From Height Map to 3D Object
If you’ve ever applied a displacement map to an object there aren’t any surprises here. I started up Max and created a plane that was divided into 64 polygons on each axis. I added a Meshsmooth modifier on top of that, so that I could control how much subdivision I was applying. Then I added a Displace modifier, using World Machine’s converted 16 bit image as my displacement map. I played around with the strength of the displacement till I liked it. You can see the terrain at this stage in the image below.
This wasn’t at all bad. But I thought that even though my displacement map was only 512 x 512, there was more detail in it than what I was getting. The obvious thing to do there was to increase the Meshsmooth value to add resolution to my object. Chancy – because it was pretty high res already – but easy to try.
So after Max crashed, I decided to try something else. First I lowered the resolution of my original object a little, so that I could increase the Meshsmooth value on an object that was initially less complex. No joy there either, I’m afraid. After some trial and error what I eventually did was to collapse the object’s stack, then apply a second, slight displacement to it with a Noise map as the source. This let me add a finer level of detail to the landscape. Here’s what that looked like:
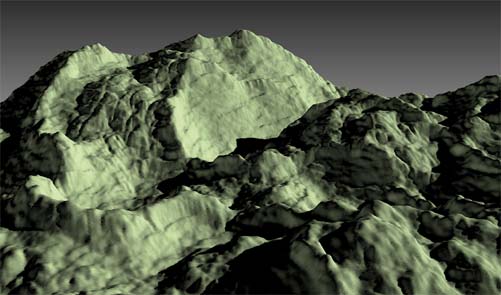
You may notice that I used the X, Y and Z tiling settings for the Noise map to create horizontal ridges in the rock face. This was much more what I was looking for. It could be that with the “Standard” version of World Machine I’d find that a higher res height map would give me that greater level of detail I wanted. But for this experiment, that second, fine-grained displacement seemed to work just fine.
And that was it, for creating the object itself. From here on out, everything was about creating the right material for the mountains.
3. The Material
 By the time I made my mountains I’d been playing around with World Machine for a couple of days and I had several texture experiments behind me already. Texturing this kind of terrain is always challenging. You want to treat the different areas (cliffs, meadows, and so on) differently, but you need those different materials to blend together smoothly and in a believable pattern. So while the materials you make for rock, dirt and grass are all important, masking the transitions between them is usually the most complicated problem.
I’ve tried lots of different things. I most often do my large area masking with vertex colors, and I generally bake in those vert colors based on lighting.
In terrain that has a lot of contrast between vertical and flat areas I often place a shadow-casting light source above the terrain. That lights the flat areas, but leaves the cliffs in shadow – so when I bake the lighting into the vert colors (with “Assign Vertex Colors”, from the Utilities panel) I get white on the upward-facing flats, and black on the vertical faces. And though I do a little hand painting afterwards, that most often gets me where I want to go.
But not this time. I guess it was the many slopes, which are typical of height mapped terrain – but for whatever reason, my usual tricks weren’t giving me the kind of vertex color mask that I needed.
So what I eventually did was to apply a Top/Bottom material to the terrain. I made both the top and bottom materials self-illuminated – one white, the other black – to better see what they were doing, and changed the “Blend” and “Position” parameters to adjust which slopes on the object went white, and which black. Although it did take some trial and error, this eventually gave me about what I needed. So I used “Assign Vertex Colors” to bake the object’s diffuse colors into its vertices, and that gave me a vertex color map that I could use to blend my materials together.
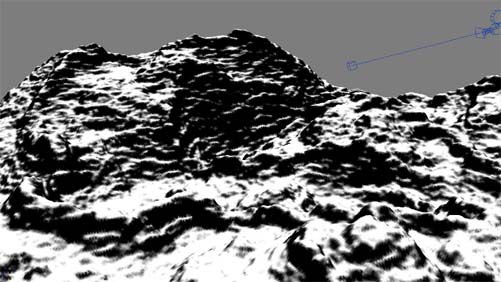
At this stage, I had a vertex color map that would let me blend between two materials. One would be for earth and grass, the other for stone. As you can see above, in the vertex color mask the white areas (flat) are to be earth and grass, while the black areas (vertical) are to be stone.
The actual material gets quite a bit more complicated – but that single division is the main one.
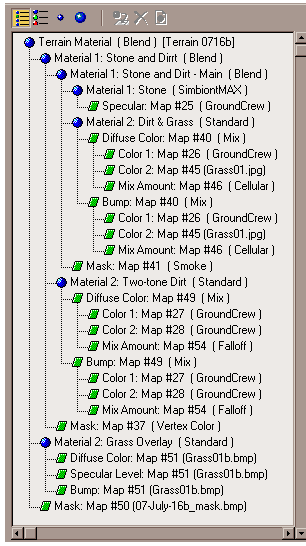 Looking at this material tree may make your brain hurt. But because it is a tree, you can see that at its top level there are two materials (“Stone and Dirt (Blend)” and “Grass Overlay (Standard”). Those two are combined using an image map which I haven’t mentioned – because it came along very late.
The material we’ve been preparing the vertex colors for is the “Stone and Dirt” material.
This uses a Dark Tree material called “Morro Rock” (coincidentally named after a huge volcanic plug that sits on the beach in a town where I used to live). That’s our stone material, which shows in the vertical faces and anyplace else where that vertex color mask is black.
Secondly, there’s a “Two tone Dirt” material which is two different Ground Crew textures (available from Digimation) mixed together using a Falloff map, set to “Fresnel”. I adjusted the Falloff mixing curve to get just the blend I wanted between these two natural textures. The Falloff map, as a mask, makes one of those textures strong on surfaces that face us; the other texture is strong on surfaces that are perpendicular to the camera. The blend between those two gives us a rich dirty surface.
These “Stone” and “Two-Tone Dirt” materials are blended together based on the vertex color mask I created above. But as you look at the material tree, you’ll see that there are several levels of materials and maps within these, which are blended based on masks; whether the vertex color mask, at the highest level, or the various Falloff and procedural masks at lower levels of the tree. So while that first vertex color mask creates the main division between stone and earth, within those divisions I’ve created additional variety and subtle gradations of color.
 The final material is the “Grass Overlay”. I found that I just needed to place some greener bits at specific places in the landscape, so I painted a mask to place those where I wanted them. A reduced version of that mask is shown here.
In fact, I guess it’s worth noting that this and the photographic grass texture are the only two image maps used in the terrain. Everything else is procedural, including the material I used to bake in the vertex colors.
Because materials and lighting are interdependent I would continue to adjust the material once I had a particular picture in the works. But as shown here it’s a nice, general sort of “almost-there” material that’ll do fine until the terrain arrives in a picture.
So there it is; for now, just a hunk of terrain. Overall I found that World Machine did a fine job – even though, as I admitted, its UI is exactly what I normally hate.
Remember that I made this test with the free version of the program. More features and higher res height maps are available in the full version, which at $40 sounds like a bargain to me.
This won’t suit for absolutely any sort of terrain you want. Height maps have an inherent limitation. They’re images that show a piece of terrain from directly above, and by definition only one pixel in the image can give height information at that position. That means that height maps can’t define undercuts in the landscape, like eroded river banks and canyon walls – and they can’t do caves or arches. You can always edit the object, of course, but for a truly wild landscape with lots of undercuts, caves, and free-standing, overhanging features you’ll want to take another tack entirely. I touched on this in my Warrior Tools tutorial.
But aside from that limitation height maps are pretty versatile. World Machine has a useful set of tools for creating interesting and realistic landscapes, and depending on the version you want, it’s either cheap, or free. Go for it!
“World Machine Pro”, which is now in development, will include some very useful features that give even more realistic terrain and options for creating landscape-based textures and texture masks (huzzah!). You can peek at the development diary for more information.
Miscellaneous notes:
- Meshsmooth Levels: 4
- Object polygons, after meshsmooth: 524,288
- Height map resolution: 512 x 512
- Image mask resolution (in World Machine): 512 x 512
- Image mask resolution (in 3DS Max, for grass): 2048 x 2048
- Sky image: based on one of many spiffy ones at CG Textures
Updates:
Like I mentioned at the start, World Machine’s come a long way since I posted this article. It’s now much easier to export a Max-friendly displacement map, for one; and among the other changes I especially like, you can export a mask image based on the terrain’s slopes, erosion, and other characteristics.